No products in the cart.
CapSkip Browser Extension Guide
Learn how to install and configure the CapSkip browser extension for automatic CAPTCHA solving.
The CapSkip Browser Extension connects your browser to the CapSkip application running on your computer or server and automatically solves supported CAPTCHA challenges.
When a CAPTCHA appears, the extension sends the request to CapSkip through the configured Server IP and Port. CapSkip solves it locally and returns the result, which the extension automatically applies on the page.
The extension supports image CAPTCHAs, Google reCAPTCHA, and Cloudflare Turnstile.
Browser Extension Installation
Install the CapSkip browser extension to automatically detect and solve supported CAPTCHA challenges while browsing.

Installation
The CapSkip extension is available for Chrome, Firefox, and Chromium based browsers.
You can install the extension directly from the official browser stores:
Chrome users can install it from the Chrome Web Store.
Firefox users can install it from the Firefox Add-ons store.
For other Chromium based browsers such as Brave, Edge, Opera, or Vivaldi, you can install the extension from the Chrome Web Store because these browsers support Chrome extensions
Extension Connection & CAPTCHA Types
Configure how the browser extension connects to the CapSkip application and select which CAPTCHA types should be detected and solved automatically while browsing.
On / Off Toggle
Use this switch to enable or disable automatic CAPTCHA solving in the browser. When turned On, the extension will detect supported CAPTCHA challenges and send them to CapSkip for solving automatically. When turned Off, the extension remains inactive and no CAPTCHA requests will be sent to CapSkip.
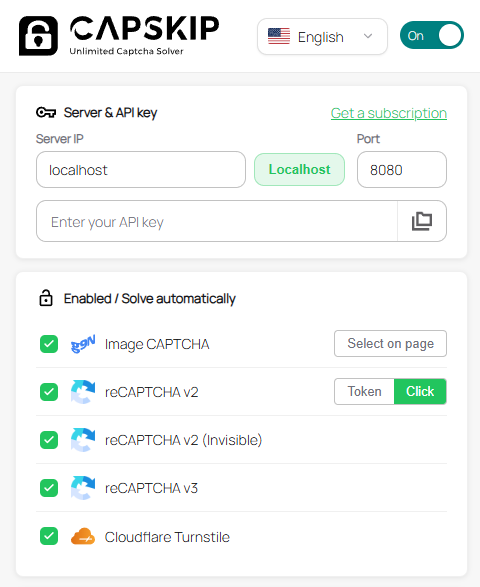
Server & API Key
This section connects the browser extension to your local CapSkip application. The extension sends CAPTCHA solving requests to the CapSkip server running on your machine or VPS.
1. Server IP
Enter the IP address where CapSkip is running.
localhost should be used when CapSkip is installed on the same computer as the browser.
If CapSkip is running on a VPS or remote server, enter the server’s public IP address.
2. Port
Specify the port configured in CapSkip. The default port is 8080.
The extension will send requests to IP:Port to communicate with the CapSkip API.
3. API Key
Enter your CapSkip API key if API key validation is enabled in the CapSkip application.
The API key adds an extra security layer to ensure that only authorized applications or extensions can send CAPTCHA solving requests to your CapSkip instance.
If API key validation is disabled in the CapSkip settings, this field can be left empty.
Enabled / Solve Automatically
This section lets you choose which CAPTCHA types the extension should detect and solve automatically when browsing.
1. Image CAPTCHA
Automatically detects and solves supported image-based CAPTCHAs through the CapSkip application.
For image CAPTCHA solving to work, you must configure the image element as the CAPTCHA source and define the input field where the solved result should be inserted.
See the Image CAPTCHA Setup section for detailed instructions.
2. reCAPTCHA v2
Handles Google reCAPTCHA v2 challenges. Two solving modes are available:
Token – Automatically retrieves the verification token and submits it to the page.
Click – Simulates human-like clicking on the CAPTCHA image challenge.
3. reCAPTCHA v2 (Invisible)
Solves invisible reCAPTCHA v2 challenges that run automatically when a form is submitted or a button is clicked.
4. reCAPTCHA v3
Processes reCAPTCHA v3 verification requests and returns the required token to the page.
5. Cloudflare Turnstile
Automatically solves Cloudflare Turnstile challenges detected on supported websites.
Image CAPTCHA Solving Setup
To solve image CAPTCHAs automatically, configure the extension to detect the CAPTCHA image and define the input field where the solved result should be inserted. This setup usually only needs to be done once per website.
You can do this in two ways:
1. Select on page: use the guided picker in the extension popup (recommended for most users).
2. Right-click menu: mark the CAPTCHA image and answer field separately using the context menu.
Both methods create the same saved binding. After setup, CapSkip can capture the image, send it to the solver, and insert the answer automatically on future visits.
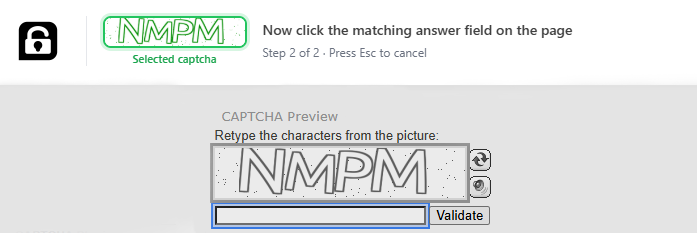
Method 1: Select on Page
Use this option to link the CAPTCHA image and answer field in one guided flow.
Open the website that shows the image CAPTCHA, then open the CapSkip extension popup. Next to Image CAPTCHA, click "Select on page". The page enters picker mode and a CapSkip banner appears at the top with step-by-step instructions.
Step 1 of 2: Click the CAPTCHA image on the page. The extension highlights elements as you move the mouse. Click the image that contains the CAPTCHA challenge. A preview of your selection appears in the banner.
Step 2 of 2: Click the input field where the CAPTCHA answer should be typed. The extension links that field to the image you selected.
When both steps are complete, CapSkip saves the binding and is ready to solve. Press Esc at any time to cancel.
Saved bindings appear in extension settings under Saved bindings, where you can review or delete them.
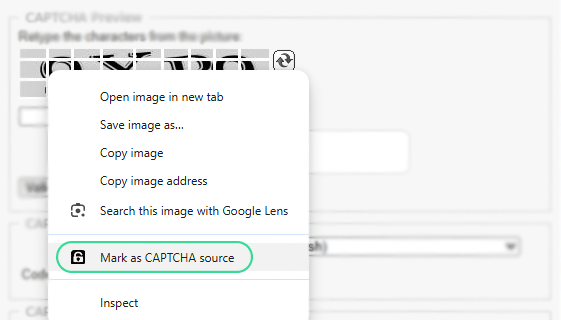
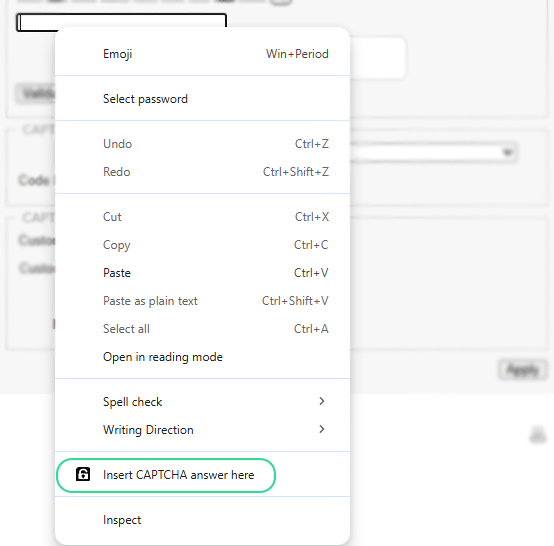
Method 2: Right-click Menu
To configure automatic image CAPTCHA solving, first identify the CAPTCHA image by right-clicking on it and selecting "Mark as CAPTCHA Source". This tells the extension which image should be captured and sent to the CapSkip solver. Then, right-click on the input field where the solution should be entered and select "Insert CAPTCHA answer here" to define where the solved result should be placed. Once both elements are configured, the extension will automatically capture new CAPTCHA images, send them to the CapSkip application for solving, and insert the returned answer into the designated input field whenever a CAPTCHA appears on the page.
Extension Settings
This section allows you to control how the CapSkip browser extension behaves while browsing.
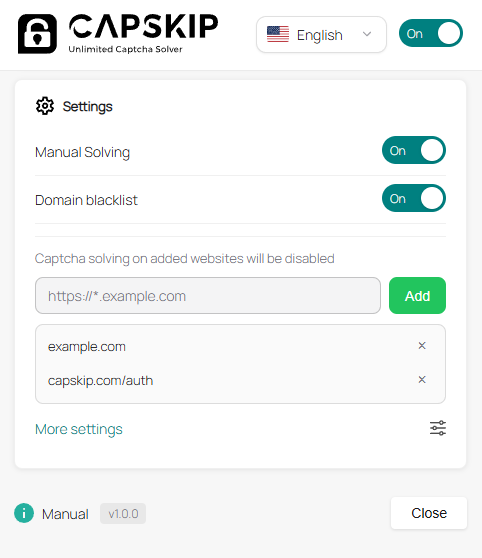
Manual Solving
When enabled, CAPTCHAs will only be solved when you manually trigger the solving action. This gives you full control over when requests are sent to the CapSkip application. When disabled, supported CAPTCHAs will be solved automatically.
Domain Blacklist
This option lets you disable CAPTCHA solving on specific websites. When enabled, the extension will ignore CAPTCHAs on any domain added to the blacklist.
More Settings
Opens additional configuration options for the extension. Optional settings are available in the section below.
Form Automation
This section provides optional automation features that enhance the CAPTCHA solving workflow before, during, and after a CAPTCHA is processed.
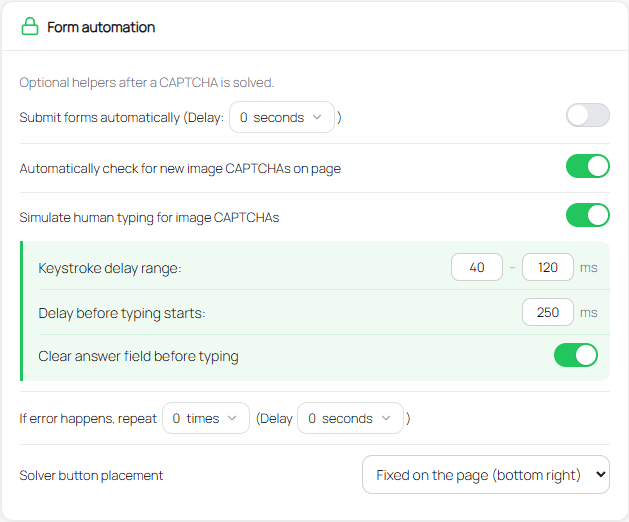
Submit Forms Automatically
When enabled, the extension will automatically submit the form after the CAPTCHA is solved. You can define a delay in seconds before the submission happens.
Automatically Check for New Image CAPTCHAs
Automatically detects new image CAPTCHAs on the page and prepares them for solving without refreshing.
Simulate Human Typing for Image CAPTCHAs
Types CAPTCHA answers character by character with realistic delays to better mimic human behavior.
You can customize the typing behavior by setting a Keystroke Delay Range, which controls the minimum and maximum delay between each character typed, and a Delay Before Typing Starts, which adds a brief pause before the answer is entered. You can also enable Clear Answer Field Before Typing to automatically remove any existing text from the input field before the CAPTCHA solution is typed. These options help create more natural and reliable interactions with CAPTCHA fields.
Retry on Error
If a solving error occurs, the extension can automatically retry the process. You can specify how many times it should retry and set a delay between each attempt.
Solver Button Placement
Choose where the manual solver button should appear on the page.
Inside the CAPTCHA form – The solver button will appear near the CAPTCHA area inside the form.
Fixed on the page (bottom right) – The solver button will appear as a floating button fixed at the bottom-right corner of the page.
AutoSubmit Rules
This section allows you to define custom actions that should run after a CAPTCHA is solved.
By default, the AutoSubmit feature automatically submits the form that contains the CAPTCHA answer field. However, some websites require additional steps after the CAPTCHA is solved, such as clicking a specific button or triggering another action. In those cases, you can create custom rules here.
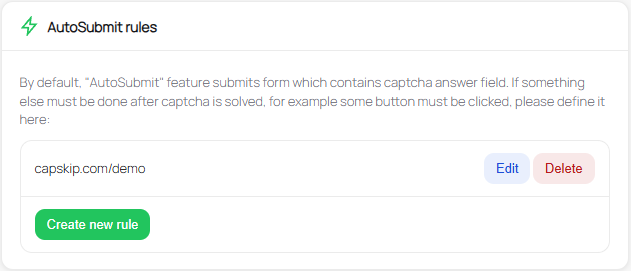
Create New Rule
Click Create new rule to add a new AutoSubmit rule for a specific website.
URL Pattern
Define the website where the rule should apply. The extension will execute the rule only on pages that match this URL pattern.
Sequence of Actions
The Sequence of Actions field defines the steps the extension should perform after the CAPTCHA is solved. Each action represents a command executed by the extension to interact with elements on the page.
Actions are written as individual JSON objects, one per line, and are executed from top to bottom in the order they appear.
Each action contains a type and a value, and some actions may include additional arguments using args.
Basic Structure
Each action follows this format:
{"type":"ACTION_TYPE","value":"ACTION_VALUE","args":[...]}Multiple actions are written on separate lines, for example:
{"type":"source","value":"document"}
{"type":"method","value":"querySelector","args":["#submit-button"]}
{"type":"method","value":"click"}
In this example the extension will:
Start from the page document
Find the element matching the selector
#submit-buttonClick the selected element
Because actions run sequentially, the order of the lines is important.
Common Actions
1. source
Defines the starting context where elements will be searched.
Example:
{"type":"source","value":"document"}2. method: querySelector
Selects an element using a CSS selector.
Example:
{"type":"method","value":"querySelector","args":["#submit-button"]}This finds the element with the ID submit-button.
3. method: click
Triggers a click on the currently selected element.
Example:
{"type":"method","value":"click"}This simulates clicking the element selected in the previous step.
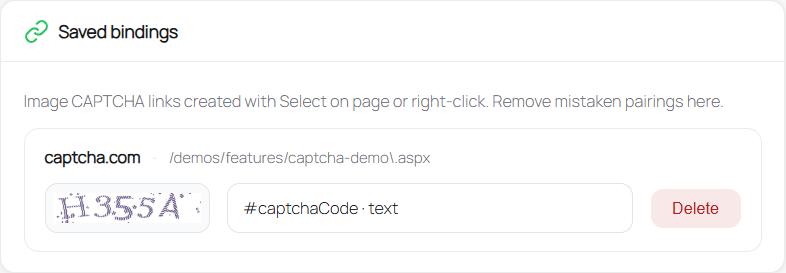
Saved bindings
Saved bindings store which image is the CAPTCHA and which input receives the answer on a given site. Create them with "Select on page" (click the image, then the field) or the right‑click options "Mark as CAPTCHA source" and "Insert CAPTCHA answer here". The list in settings shows each site, URL pattern, captcha preview, and answer field. Delete any binding that is wrong or outdated, then set it up again on the live page.